How to Refill a Pod System Without Spills?

Time:2026-10-27 Author:Isabella
0%

Refilling a pod system looks simple, yet small mistakes can create leaks, sticky fingers, and wasted e-liquid. This guide explains How to refill a pod system without spills using practical, controlled steps. It focuses on pod design, liquid flow, and careful handling rather than rushed refills. Experienced users still make mistakes, especially when filling a narrow reservoir under poor lighting.

Begin with a clean, stable surface, such as a kitchen counter covered with a paper towel. Turn the device off and remove the pod if the manufacturer allows it. Check the mouthpiece, fill port, rubber seal, and pod body for cracks or residue. Use only compatible e-liquid recommended by the device manufacturer. Keep the bottle tip inside the fill port, not the central airflow tube. Tilt the pod slightly and squeeze slowly. Stop below the maximum line, leaving room for pressure to settle. Do not force extra liquid inside.

Small details matter.

After closing the seal firmly, wipe the pod with a dry tissue and let it rest upright for several minutes. This pause helps reveal leaks before use. If liquid enters the airflow channel, gentle blotting works better than aggressive shaking. A faint gurgle may indicate overfilling, a loose seal, or excess liquid in the chimney. Recheck the instructions, because pod designs differ. Some information online is inconsistent. Manufacturer guidance remains the safer reference. Even this method is not perfect; worn seals and temperature changes can cause unexpected leakage. Careful refilling reduces spills, but it cannot replace regular pod inspection.
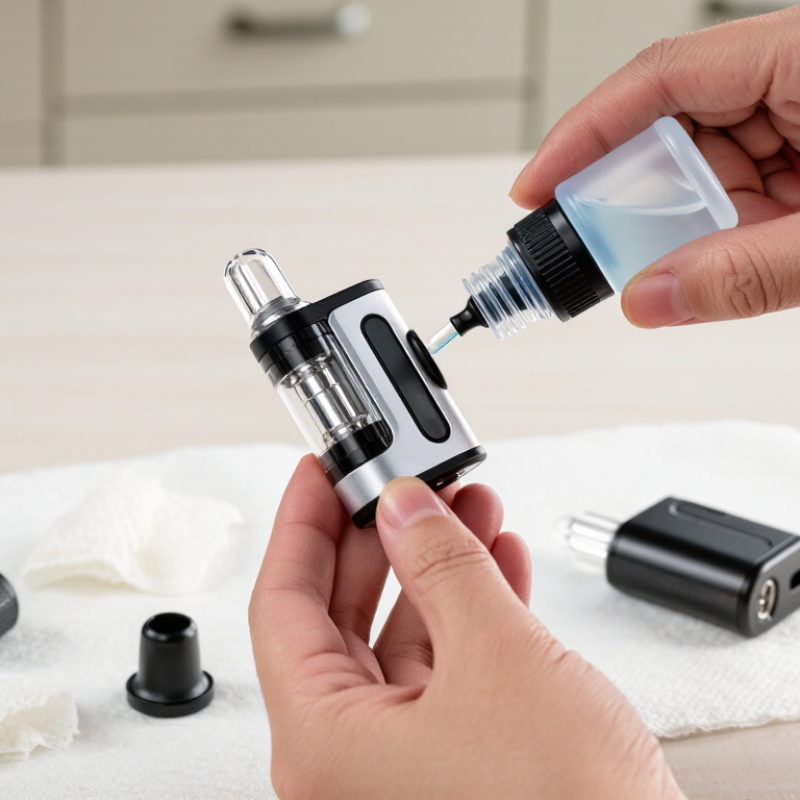
How to Refill a Pod System Without Spills?

Understanding Pod System Components and E-Liquid Compatibility

Spill-free refilling starts with understanding the pod’s parts. A pod usually contains a reservoir, coil, mouthpiece, airflow channel, and electrical contacts. Identify the fill port before opening it. It may sit beneath a silicone plug or beside the mouthpiece. Keep the pod upright, and add liquid slowly along the inner wall. Never fill the central airflow tube. Leave a small air gap to reduce pressure and leakage.

Not every e-liquid suits every pod. Thin liquids move easily through small coils, while thicker liquids may cause dry hits or poor absorption. Check the device instructions for the recommended PG/VG balance, liquid volume, and coil resistance. Compatibility is not guesswork. The National Academies of Sciences, Engineering, and Medicine reported in 2018 that aerosol chemistry changes with device settings and liquid composition. That finding makes correct liquid selection important, not optional.

A 2024 Action on Smoking and Health survey estimated 5.6 million adults in Great Britain used e-cigarettes. More users also mean more refill mistakes. After filling, close the plug firmly, wipe the contacts, and let the pod stand for several minutes. I still sometimes overfill when rushing. That is a useful warning. If liquid reaches the mouthpiece, remove it before use. Replace damaged seals, and follow local product-safety requirements.

Preparing the Pod System and E-Liquid for a Clean Refill

How to Refill a Pod System Without Spills?

Preparing the pod and e-liquid properly makes refilling cleaner and safer. Work on a flat surface with a paper towel underneath. Turn the device off and keep it upright. Check the pod for cracks, loose seals, or darkened residue. Do not use damaged parts. Wash your hands before handling e-liquid, and keep the bottle away from children and pets. A child-resistant cap helps, but it is not perfect protection.

Read the bottle label before opening it. The National Academies of Sciences, Engineering, and Medicine reported in 2018 that e-liquid exposure can cause nicotine poisoning, especially through swallowing or skin contact. Wear disposable gloves if the liquid contains nicotine. Open the pod slowly. Find the side fill port, not the central airflow tube. Tilt the pod slightly, then squeeze the bottle gently. Stop below the maximum line. Overfilling often causes leaking.

Wipe the tip before closing the bottle. Keep the pod upright for several minutes. This allows the internal material to absorb liquid evenly. I sometimes rush this step. That usually creates gurgling. If liquid reaches the airflow channel, remove the pod and blot it carefully. Never blow liquid into the device. The U.S. Centers for Disease Control and Prevention reported 10.0% of high school students used e-cigarettes in 2023, showing why careful storage matters around young people. Check the seal again before use. A small leak deserves attention.

Removing the Pod and Opening the Correct Filling Port

How to Refill a Pod System Without Spills?

Removing the pod is the safest starting point. Turn the device off and place it upright on a clean, dry surface. Grip the pod firmly, then pull it straight out without twisting. Some pods release easily, while others need a gentle rocking motion. Do not force it. Check the pod’s sides for a rubber stopper, sliding cover, or small filling hole. That is the correct filling port. The central opening is usually the airflow path, not the place for liquid. Filling it can cause leaking, gurgling, or liquid in the mouth. Take a moment to inspect it.

Open the filling port slowly and keep the pod tilted slightly. Touch the bottle tip to the opening, then add liquid in small amounts. Leave a small air gap near the top. Overfilling is a common mistake. I once filled a pod too quickly and missed the port, leaving liquid around the contacts. Wipe those contacts with a dry tissue before reconnecting the pod. Close the stopper completely, then check for gaps. Wait a few minutes before using the device, especially if the pod contains a fresh internal coil. Reinstall it gently until it sits evenly. If liquid still appears, stop using the pod and inspect the seal. Small spills are manageable. Repeated leaks need attention.

How to Refill a Pod System Without Spills? - Removing the Pod and Opening the Correct Filling Port

Step Action What to Check Spill-Prevention Measure Typical Time
1. Prepare the area Place the device on a flat, stable surface and keep the e-liquid bottle upright. The surface is clean, dry, and well lit. Avoid refilling while walking, driving, or holding the device in the air. About 30 seconds
2. Remove the pod Hold the device body firmly and pull the pod straight up. If it is attached magnetically, use gentle, even force. The pod separates without twisting, bending, or forcing the connection. Keep the pod upright so liquid does not move toward the mouthpiece or airflow channel. About 10–20 seconds
3. Locate the filling port Inspect the pod for a silicone stopper, rubber plug, or hinged filling cover. The correct port is usually marked by a small opening, plug, or fill symbol and is separate from the central airflow chimney. Do not pour liquid into the center airflow opening or the mouthpiece. About 15 seconds
4. Open the correct port Lift the silicone plug by its tab or open the designated cover without removing unrelated parts. The fill opening is fully accessible and the plug remains attached or safely placed nearby. Keep the pod vertical and avoid stretching or piercing the seal. About 10 seconds
5. Add e-liquid slowly Insert the bottle nozzle into the filling port and gently squeeze a small amount at a time. Stop below the maximum fill line or leave a small air gap instead of filling to the brim. Use a narrow nozzle and pause if liquid rises quickly or bubbles back through the opening. About 20–40 seconds
6. Close the port Press the silicone plug fully into place or close the filling cover until it sits flush. The seal is flat, secure, and free of visible gaps. Wipe excess liquid from the port and pod exterior before reinstalling it. About 10–15 seconds
7. Allow the coil to saturate Leave a newly filled or completely empty pod upright before vaping. The wick has had time to absorb e-liquid and the pod remains free of seepage. Do not immediately take repeated puffs from a dry replacement coil. About 5–10 minutes
8. Reinstall and test Insert the pod straight into the device and take a gentle test puff. The pod sits securely, airflow feels normal, and no liquid appears around the connection. If gurgling or leaking occurs, remove the pod, wipe the contacts, and check that the fill port is sealed. About 20–30 seconds
Safety note: Use only the e-liquid recommended for the pod system, keep e-liquid away from children and pets, and wash skin promptly with soap and water after contact.

Adding E-Liquid Without Overfilling or Creating Air Bubbles

Refilling a pod system cleanly starts with preparation. Wash and dry your hands, then remove the pod from the device. Check the liquid level through the window before opening the fill port. A narrow bottle tip gives better control than a wide nozzle. Insert it gently into the port, but do not push hard.

Fill slowly along the inner wall, away from the central airflow tube. That tube must remain clear. Stop below the maximum line, leaving a small air space at the top. The space helps prevent pressure buildup and reduces leaking. Pause halfway. Let the liquid settle.

Watch the bubbles.

If a large bubble blocks the port, tilt the pod slightly and tap it with one finger. Do not shake it. Shaking can spread liquid into the airflow path. Close the silicone plug firmly, then wipe the outside with a dry tissue. Leave the pod upright for a few minutes before using it.

I used to fill too quickly and blame the pod for every leak. That was unfair. The real problem was usually a flooded airflow channel or a loose plug. I still occasionally add too much liquid when the level window is hard to read. In that case, removing a small amount with a clean tissue is safer than forcing the pod back into the device. Inspect the mouthpiece and contacts before reattaching it. A dry connection is easy to overlook.

How to Refill a Pod System Without Spills?

Adding e-liquid to about 80% of a pod’s nominal capacity leaves approximately 20% headspace, helping reduce overflow and giving trapped air room to escape.

These values are calculated examples based on an 80% filling target: keep the bottle tip inside the fill port, add liquid slowly, avoid the central airflow tube, and wait briefly for bubbles to clear before sealing the pod.

Sealing, Reinstalling, and Checking for Leaks Before Vaping

How to Refill a Pod System Without Spills?

A clean refill starts with a steady surface and good lighting. I remove the pod from the device before opening its fill port. This prevents liquid from reaching the battery area. I wipe the mouthpiece and pod exterior with a dry tissue. Small drops can make the device feel faulty.

I keep the pod upright and fill it slowly along the inner wall. I leave a small air gap instead of filling to the brim. Overfilling can force liquid into the airflow channel. After filling, I press the silicone seal firmly until it sits flat. The seal should not look twisted, raised, or partly open. I used to close it too quickly. That caused more mess than the refill itself.

Before reinstalling the pod, I inspect the bottom contact area and surrounding edges. Both should be clean and dry. I reinstall the pod gently, without pushing it at an angle. Then I wait for a few seconds and check the base with a tissue. A damp mark means I remove the pod and inspect the seal again. I do not vape through a leaking pod. Sometimes the problem is not the seal but a cracked pod, loose closure, or excess liquid in the channel. If the leak continues, I stop using that pod and follow the device manufacturer’s care instructions. My check is simple, but I still occasionally miss one drop.

FAQS

What parts should I identify before refilling a pod?

Find the reservoir, coil, mouthpiece, airflow channel, and electrical contacts. Locate the fill port carefully. Do not fill the central airflow tube.

How can I prepare for a cleaner refill?

Turn the device off and place it upright on a flat surface. Put a paper towel underneath. Check for cracks, loose seals, or dark residue.

How should I add liquid without spilling?

Insert a narrow bottle tip gently into the fill port. Add liquid slowly along the inner wall. Stop below the maximum line.

Why should I leave an air gap?

A small gap reduces pressure buildup inside the pod. It can help limit leaking. Do not fill it completely.

How can I prevent bubbles from blocking the fill port?

Pause halfway and let the liquid settle. Watch the bubbles. Tilt the pod slightly and tap it gently instead of shaking it.

How do I choose compatible e-liquid?

Check the device instructions for the recommended liquid thickness, volume, and coil resistance. Thin liquids suit some small coils better. Thicker liquids may absorb poorly.

What should I do after closing the pod?

Close the silicone plug firmly and wipe the outside. Keep the pod upright for several minutes. This gives the internal material time to absorb liquid.

What should I do if the pod leaks or gurgles?

Remove the pod and inspect the airflow channel, mouthpiece, and seal. Blot excess liquid carefully. I sometimes rush filling, so I check my technique before blaming the pod.

How should I handle liquid safely around children and pets?

Keep the bottle closed and stored out of reach. Avoid skin contact and swallowing. Child-resistant caps help, but they are not perfect protection.

When should I replace a pod?

Replace it when seals are damaged, cracks appear, or residue becomes unusually dark. A leaking connection should stay dry. Small problems deserve attention.

Conclusion

This guide explains How to refill a pod system without spills by focusing on preparation, compatibility, and careful handling. Before refilling, identify the pod’s main components and confirm that the e-liquid is suitable for the device. Place the pod and liquid on a stable, protected surface, and keep the filling area clean to prevent dust or residue from entering the pod.

Next, remove the pod gently and locate the correct filling port, avoiding the central airflow opening. Add e-liquid slowly along the inside wall, leaving enough room for air and preventing overfilling or bubbles. Once filled, close the seal securely, wipe away any excess liquid, and reinstall the pod firmly. Check the connection and inspect for leaks before use. Allowing the liquid to settle briefly can also support smoother performance and reduce the chance of leakage.

Isabella

Isabella

Isabella is a dedicated marketing professional with a sharp focus on driving brand growth and engagement through strategic content creation. With an extensive background in digital marketing, she combines her passion for storytelling with her keen understanding of industry trends to deliver......